
Looking for stunningly beautiful hair highlight ideas?
Or maybe you’re in need of inspiration for streaks of color that will turn heads?
Want to find out how to add gorgeous multi-dimensional highlights to add extra oomph just in a more natural looking way?
Well, you’re in luck since here’s what you’ve been looking for but couldn’t find.

Over the course of the summer the sun kisses our hair adding some natural yet subtle highlights and depth.
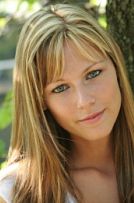
Who doesn’t love that look? Those golden glints of gorgeous dark blonde or caramel streaks are so delightful. They suggest you’ve been frolicking in the surf all summer.
Plus they add a bit of glow and dimension your hair just doesn’t have otherwise. If you wish you could have that look all the time here’s what you need to know about streaking your strands.
The way to achieve those buttery streaks year round is with highlights and lowlights either done at home or by your stylist. Color variation like this is an easy way to glam up most any style and see a whole new you staring back out of the mirror in the morning.
That’s right. Highlights give you a quick and sexy way to glamorize and change the appearance of your hair.
So
- if you want to change your look from boring blonde to sun kissed blonde or plain old brunette to sexy irresistible brunette…
- if you want to add fullness and dimension to your look, or accentuate your face…
- or you simply want to look more glamorous
then there’s one solution for all these wishes – highlighted hair.
This is all the more true if you have fine hair where volume is a real challenge. That’s because adding subtle streaks of color would certainly give you the appearance of extra body and volume you’ve been aiming for.
Quick Section Navigation
Naturally you can read along or jump straight to the topics that most interest you.
- What to Know About Typical Types
- Other Dimensional Color Ideas Trending Now
- These 5 Game-Changing Hacks Make a Big Difference
- Three Ways to Home Highlight
- Choosing the Perfect Complimentary Color
- What’s the Difference Between Balayage and Foiling?
- Four Home Highlighting Difference Makers
- Here’s 10 Tips and Highlighting Ideas For When Doing Them at Home
- How to Maintain Your Look
What to Know About Typical Types of Highlights
Here’s a quick overview of five or six of the most common types we’re asking stylists for.
- Natural: This type aims to give you a natural look as if you got those strands bleached naturally from hours of sun exposure over the course of the long summer. You’re looking for a color usually a shade or two shades lighter than your base color without highlighted stripes.
Here’s the trick. If you want amazing surfer girl hair only highlight skinny strands of hair all over your head – think no more than five to 10 hairs at a time.
Beyond that some will look to combine highlights with lowlights to add more dimension to the overall look. The final effect is nothing short of dramatic – especially when the sunlight is reflecting off your hair.
- Chunking: As the name suggests, this type of highlight appears in bolder chunks that produces a more dramatic look.
The term itself should suggest to you that the streaks can be as wide as 1-2 inches and are distributed throughout the hair.
This works well for both long and short hair and this is ideal if you want to achieve a somewhat bolder look.
There are highlighting skull caps available that have wide perforated holes in them which will let you pull out chunks of hair to bleach them. The goal is to avoid an over done look when you are done.
- Peek a Boo: This more artsy, trendy style involves highlighting random hair strands away from the hair line so they appear somewhat hidden. This somewhat stunning look is most often achieved through a somewhat random more freehand painting technique. They will only be visible once your hair is styled or parted in a way that actually flaunts the hidden highlights. Or they may dramatically peek out whenever you stroke your hair.
You may choose to section the strands and fold them in foils. Or you can also do away with the foil or cap and just apply the solution directly onto the hair.
Also, many prefer having this peek a boo effect because it’s much safer on the hair. It doesn’t require the use of bleach. And the product won’t have to be applied directly to the hair root.
Plus this also means bigger savings since it doesn’t require any pricy touch ups of the hair roots.
So if you want to achieve a funky and artistic look without too much maintenance, then this type of highlight would be your ideal choice.
- Balayage: Let’s shed some light on this more carefree approach that was first seen in France. Basically it involves lightening just the ends of your hair while leaving the rest hair shaft your natural darker color.
Ideally you want an outcome that looks naturally sun kissed.
To achieve this a brush and paddle are used to apply the color onto the hair in a somewhat haphazard sweeping motion to create an unpredictable and more edgy result.
Balayage is a good choice if your aim is to discreetly emphasize your facial features especially if you wish to bring more attention to your eyes. Plus they tend to look quite natural as they grow out. Just don’t expect the exact same look to be duplicated each time. Can’t be done.
- Framing: This type of highlight aims to frame your face by brightening your skin and emphasizing your facial features.
The look is accomplished by adding streaks of lighter shades with the lightest color found in the strands in very front of your hair. Some would describe it as creating an illusion that your face is glowing. This summery hairstyling technique can actually give you a more youthful look.
Other Dimensional Color Ideas Trending Now
If you’d like to bulk up your brain even more here’s four other overviews covering the different types of multidimensional hues currently all the rage.
Who knows? These quick guides may just help you decide what kind of streaks to ask for the next time you sit in your colorists chair.
- Hair Highlighting Lingo Got You Confused? Here’s What It All Means
- Babylights: The (Non) Hair Diva’s Essential Guide to Baby Lights
- Ombre Hair: The Lazy Girls Way to Lightening Things Up
- Peekaboo Highlights: 5 Things To Know To Make Your Hair Sizzle
These 5 Game-Changing Hacks Make a Big Difference
Here are five hacks to know if you want your highlights to be natural and amazing looking.
Avoiding Mr. Stipey: You really don’t want to see stripey highlights in the salon mirror.
 Actually stripey highlights usually come down to a technique thing. Often resulting from the coloring of ginormous chunky slices of hair either because of inexperience or haste.
That or poor foil placement.
An epic fail on either count increases the odd badger stripes will be yours.
To avoid this what should happen is the colorist should be working with many (read a lot) of finer “weaves” or sections of hair. Of course this takes more time which makes them cost more.
Perfect Placement: Highlights are like real estate meaning it’s all about location, location, location. To create the perfect look they have to be put into the perfect parts of your head.
If you want them to look like sun kissed strands of hair you want them placed randomly, yet where the sun would hit your hair anyway.
Multi-tonal: The third tip for best results would suggest you want your highlights to be multi tonal using complementary colors in the same color family as the rest of your hair.
Non Committal Color: A lesser tip would be to point out highlights are a totally natural way for brunette beauties to flirt with blonde hair. While blondes can ignite their color by opting for lowlight streaks to introduce some darker dimension to their locks. Neither is huge color commitment.
Protect and Hydrate: The final tip involves after care. Because even though they’re only sparsely placed highlights that doesn’t mean they can’t prematurely turn dull, brassy, or fade on you if you aren’t careful.
So take care if you plan time outdoors to cover your hair with a hat or a cute scarf of some sorts. Sun exposure is the last thing those vibrant strands need if fending off color depletion is the goal.
Also don’t lose sight of hydration. Any coloring will be drying. One way to keep that in check is to apply a nourishing mask and leave it on for the duration listed on the label.
Of course more and more budget conscious women are now considering doing it themselves. Knowing as they do that coloring done at salons can be crazy expense easily costing $80, $100 or more. While DIY highlights might only run around $10 to $20 and sometimes be indistinguishable from salon results. Which makes it tempting to do yourself.
If you’re planning to do this hair alchemy on your own, you now know more about the different kinds of highlights. But what about various techniques used? What do you need to know about those?
Three Ways to Home Highlight
Whatever type of highlight you want to achieve its important to use the appropriate technique. Keeping in mind most often that less is more. The different highlighting methods available include:
Spray-on highlighting: This product is sprayed directly onto the hair to give it a slightly golden, somewhat temporary, shimmer.
Who is this product best suited for? Those with blonde hair will mostly likely appreciate the results since it will give your lighter locks a golden glow.
 Those with darker hair perhaps not so much. You may not get the blonder effect you want and instead find yourself left with a more orange or reddish look. Ugh! So it may be anyone other than blondes need not apply.
Also with some of these the color needs to be activated first for it to develop properly. And this is done using heat either from sun exposure or from a sunlamp.
Those with over processed hair might be wise to steer clear of this product. Otherwise your hair could easily get damaged since UV rays combined with bleach is not exactly the recipe for soft shiny hair.
Finally you’ll want to be careful not to spray too much or it can result to an uneven application that could alter your look in a less than flattering way instead of enhancing it.
Skullcap highlights: This route involves wearing a dorky looking skullcap designed with perforated holes all over that you pull the strands of hair to be highlighted through using a hook of some sorts.
As you’d imagine this isn’t going to be a quick process since you want to pull fewer strands of hair through as many of the holes as you can to get subtle yet evenly distributed highlights. That means girls with long hair probably need not apply. Curly girls aren’t necessarily good candidates for these either. But for those with medium length or shorter hair they can work quite well.
Plus removing the cap without ripping your hair out after rinsing out the color can be tricky (although applying conditioner can make that easier). Which is one reason why you either love these or hate these or so it seems.
The nice thing though is this lets you only highlight the strands you want colored while leaving the rest of your hair untouched by the bleach – if you are careful to not apply the lightening solution too close to the cap. Otherwise it can bleed through the holes.
These kits are available in various shades and typically include everything you need including the skullcap, lightening powder, a hook, rubber gloves, and instruction guide.
You’d be smart to read and follow the instructions carefully. At least the first few times or until you get the hang of it.
Provided you follow the instructions carefully, you may opt for highlights all over your head or just to frame your face. Remember that leaving the bleach on less than the ideal time will not give you much lightening and may leave you with brassy strands; while leaving it on for too long could lead to fried strands. Which would not exactly be the kind of reaction you’re going for. So be sure to keep your eye on the clock.
Still when done right you can achieve unbelievably naturally looking highlights that look like you paid to have professionally done.
Paint-on highlight: Perhaps this is the easiest method for adding highlights to your hair since you only need to paint it on and you’re done. So it’s perhaps the safest method since there are no risks of hair damage. Usually the kit would already include the paintbrush, wand, or bristled applicator which is needed for application.
Whichever method you choose you want to keep the result real not fake looking. You want the highlights to brighten and be natural looking so they add a degree of richness to darker hair and play up lighter colors. There’s a fine line between looking sun-kissed and going overboard and heavily highlighted hair isn’t the look you are going for, okay?
Choosing the Perfect Complimentary Color
Actually if you think about it your options are virtually limitless. Still choosing the right color comes down aligning the streaky shade to your base hue to intensify the overall appearance of your hair. Also remember you want to lighten just a smidge in the summer to work with any bronzing going on with your skin. Doing so can help you pull off the I-just-got-from-the-beach kind of look.
- For Blondes: Working with lighter, ultra-pastel colored hair means you can go up or down a shade or two with gorgeous results without overdoing the contrast. Going darker with lowlights can make your hair more seductive. While going lighter adds more shimmer to your base color. Going with multitonal shades won’t threaten your overall color either. Then too lighter tones like platinum or golden blonde also do a great job of hiding any encroaching gray hair.
- For Red-Haired Ladies: Redheads can benefit from this technique too. Your most flattering color choices for your highlights would be golden blonde or caramel. Just be sure to coordinate your make up so it works with your more vibrant hair.
- For Brunettes: Coloring like this is a great way to bring darker hair to life. To give some pop if you would. They easily add some pop, drama and dimension to darker hair. If you’re going for a more natural look think a color palette that includes sandy beige tones or maybe even auburn for a bit of warmth.
- For Raven Beauties: Black dark colored hair is intense to begin with. In this case you can go for light brown streaks, a touch of blonde or play around with colors like red or blue to give a vivid twist to your hair. These would be the color choices usually considered best for black hair.
Sure I know picking color sounds simple and all. Just remember that the right color can make or break your highlighting efforts.
What’s the Difference Between Balayage and Foiling?

As much as there are different colors for highlights to choose from, salons also use different techniques to insure highlighting a success. Two are more common. Many colorists use the foil method while others favor Balayage. Let’s shed some light on how they differ.
Foil
When using the foil method, your colorist separates small sections of hair to be highlighted with her comb. Wrapping the strands in foil keeps them isolated from the rest of the mane. Usually this is the method used if you’re going for highlights all over your head or if you have long hair. How long the foil has to stay in place to allow the color to develop actually depends on the natural color of your hair. It should be obvious that it may take longer for the bleach to work its magic if you have very dark hair color. This could also mean you may need to have your hair processed the second time to get the desired outcome.
Balayage
In this type of method, the coloring agent is painted directly on the separated hair strands which you wish to be highlighted. That means no foil is involved. Here you simply paint the color onto the hair in a sweeping motion. The effect is a more natural since you won’t be able to find any distinct streak marks. Balayage produces highlights then that are less stripy, more understated, and surprisingly more controlled. You can also go for multiple shades to make the roots less noticeable so you won’t have to do frequent root touch ups.
Now that you pretty much have an idea of the different kinds of highlights and some of the highlighting techniques, maybe you feel you’re ready to tackle this on your own. Know this. Doing so requires careful planning and precisely timed execution. Otherwise your highlights may come off as obviously done at home and can end up ruining your overall look.
Four Home Highlighting Difference Makers
Basically there are four major points you need to take note of:
- The Right Color: You’ll never go wrong if you just stick to a hue that is no more than two shades lighter that your base hair color. This way you also get a more natural looking result. Plus there will be less maintenance to deal with.
- The Right Amount of Hair: If you have straight locks you want to go thinner at the roots as the section you’re working with gets wider as you work your way down to the ends. This actually creates a lovely effect as your hair grows out too. If you have curly hair, do it in reverse.
- The Right Amount of Time: Too short of a time leaves you with orange or brassy streaks. Too long can fry your hair. So like Goldie Locks you want it to be just right.
- The Right Placement: Basically you have the option of putting in highlights around your entire head or you may also choose to just do the highlights around your face. Again, this depends on what look you want to achieve.
So much for the basics. As you can see you pretty much need to plan out what look you want to achieve when doing the highlights.
- Is it to frame your face?
- Or is it to add dimension to your look?
- Do you want to make it look natural?
- Or you just want a bolder, edgier style?
Having answered questions like that you can then move on to apply tips like these:

Here’s 10 Tips and Highlighting Ideas For When Doing
Them at Home That Can Make You Look Fabulous
- Start Clean. It’s not wise to try to highlight oily, greasy hair. So before you even start be sure to shampoo your hair.
- Select the Right Kit. That means making sure you’ve got the right color and the right tools. Like if you want to do the chunks be sure you’ve got some gloves on.
- Strand Tested and Approved. You can’t just do the application on your entire head only to suddenly discover it’s not the color that you wanted after all. Or worse the result you get looks awful. So play it safe. Also, don’t mix the entire dye. Start mixing it little by little until you get the desired color.
- Streak Small Sections. The thinner the streaks the more natural it looks. Highlight small sections of hair that’s together are thinner than a piece of spaghetti. Preferably angel hair spaghetti thin or about 10-15 strands of hair. This holds true especially when you have darker hair. And if you’re using a skullcap, pull hair through the tiniest holes available.
- Strictly Limited. If free forming you might want to use the three-finger guide. It’s a way to insure you don’t overdo any highlights you put in. Use three fingers and put them on the crown of your head. The points where they touched are where you should be highlighting. And from there pinpoint a total of nine such spots. In no way should you highlight more than 15 separate sections especially if this is your first time. Otherwise you may not get the natural looking results you were expecting but more of a stripy mess.
- Sidestep the Hairline. When putting in face framing streaks you don’t want to put in any right on your hairline. Give them some room by leaving maybe a quarter inch space beneath the hair line. This way, it won’t be too obvious once the hair on the roots start to grow. Besides, if anything gets botched, you can easily cover it up. Then spread the dye all the way down to your ends.
- Swab With Cotton. Is your dye applicator too wide for the section of hair? Use a cotton swab to spread the dye instead.
- Separated by Foil Wrap bleached strands in pre-cut squares of aluminum foil. This way the other parts of your hair which should not be highlighted won’t be affected by the bleach.
- Shine Glazed. Don’t forget the glaze. Once you’re done with the dye, be sure to follow this through with a gloss treatment. Whether you choose the clear one or the colored gloss, this is important to help blend all the colors together and to make the highlights appear brighter.
- Set, Rinse and Blow Dry. Follow the instructions carefully especially on low long the dye should stay before you rinse. Blow dry after rinsing. And if you’re find the highlights to be too contrasting from your base color, simply do the glaze step again using a darker shade of colored gloss.
So having come this far you don’t want them to fade away before their time. Which in the case of highlights can be as long as 10 weeks for some.
How to Maintain Your Look
While an advantage of highlighting is to get a low maintenance look there are a few hair care tips to keep in mind to maintain them and keep the color vibrant longer:
- Think hard about using a shampoo specially formulated for color treated hair. Since it’s been through enough look for those with intense hydrating formulas to avoid drying your hair out further.
- Same theme, different product. Deep condition your hair once a week to keep your tresses constantly hydrated. In no world is peroxide good for your hair.
- Redo the glaze step once in a while.
- Avoid tying your hair back constantly. Pulling your hair back will keep the hairline exposed to the sun so it could fade easily. A better option is to try to wear your hair down at least some of the time.
- Touch up the roots but only when necessary. You can do this on your own if you wish. Simply pull back your hair in a ponytail and apply the product on a few strands around your hairline and down your part using a clean mascara wand. Give it maybe 10 minutes developmental time then rinse thoroughly.
One last tip: If you’re planning to pay big bucks to have this done by a salon pro at there could still be some risk involved. You see, this is more of a job for a virtuoso not for someone learning on the job on your hair.
Yet believe it or not not all salons have the requisite hair coloring experts on staff. So be sure to ask for someone who specializes in highlighting when calling to make your appointment. If you’re told everyone one does at a shop then fact is no one does — which isn’t what you want. So keep looking.
And don’t be too eager to get going. Do a test run first by getting one or two streaks highlighted and see from there if you should move forward or not.
Finally maybe you’d like to see some examples of hot highlights? Then take in the sights and glean what you can to spice up your locks from this collection of seductive highlighted looks.
Listen up. Any girl looking for a change of pace when it comes to her hair might do well to embrace highlights. They are an easy way to bring out your inner beach girl without having to go to the beach. And when done right your hair will look just absolutely fantastic. You’re gonna love how you look.

Please follow our hair coloring board on Pinterest for even more dye inspiring tips that can up your color game like those just revealed?

Hello, i have mousy blonde hair with silver grey coming through 25% and have a few face framing beigy very light foils and a bit up the top. I have been wondering if twice a year is enough because a few people have commented it needs doing, maybe i should have them done every 3-4 months instead. I dont want a base colour underneath as i can get irritated by that so prefer the foils only. i kind of feel i look a bit older too with silver grey coming through, but i reckon its going to be silver white most of the way through in a few years. what do you think about how often and also once i have more silver grey.?Thanks Jean
You might want to consider applying semi permanent at the roots to blend in the silver hairs between foils: something that matchs your highlights or is a tiny bit darker giving a more natural sunbleached look.
Your colored hair won’t be lightened at the roots but the silver hairs will turn blonde. The hair color would fade and you would apply it again as the greys come through.
You can get some low allergenic products or make your own semipermanent by mixing equal parts food grade 20 vol (6%) peroxide and a natural homemade coloured tea.
It can be walnut hull tea or chamomile tea, regular black tea for reddish hue, even coffee. Do a test sample. You want the tea quite dark for your testing and play around.
By mixing equal parts peroxide and tea, the overall concentration of peroxide would be 10 vol (3%) peroxide which is the concentration for a semi permanent.
Don’t go playing with higher concentrations of peroxide as you will get more complicated demarkation lines showing as your hair grows out and everything becomes a bit more complcated especially for your hairdresser.
The colour would wash out or fade out eventually but can even be applied with a spray bottle and left in if you don’t need things perfect. You can thicken it with various things like xanthum gum for application precision. If you don’t thicken it you don’t need to wash it out and can leave it in, just wipe away from the hair line and be careful what cloths you wear. The peroxide loses its activity after 30mins. Cover your head with ceranwrap to keep it all moist for 20mins then just let it dry or rinse out if you want.
If you were a brunette, which you are not, you might be riskying some orangy brassiness long term. But as a mousy blonde this would only create a more beachy look long term.
Some people just use tea but for stubborn greys this can be impossible way to color them.